I have just bought a Zippy 4200mAh Life battery which comes with 5.5 mm bullet connectors I have considered changing the connectors to powerpoles. I have some 30A PP’s in the ‘junk box’ however, I don’t have the PP insertion tool. Has anyone assembled the PP’s without the aid of the insertion tool and if so what did you use?
Do you mean the “crimp tool”? If so then you can just solder the wires in place. If you do want to crimp them then you need either the proper tool or a clone of it because you need to not flatten the ferrule because it won’t fit if you do.
Inserting the contacts in the body is just a case of pushing them in, helped with the blade of a small screwdriver for thinner wire to make sure they ‘click’ into place.
It is the insertion tool that I was querying but you have answered that by the use of the blade of a small screwdriver to make sure it clicks into place.
You don’t need any special insertion tool for PowerPoles. I have the special crimpers but I just use needle nose pliers or a screw driver blade to push the pins in until they click. It’s not difficult at all. Of course you need to insert the pins with the correct orientation and not flipped around the wrong way.
Anderson recommend against soldering and the Powerpole crimper from West Mountain Radio PWRcrimp - Crimp Tool for Powerpole® Connectors - West Mountain Radio and available from several UK suppliers does an excellent job and is well worth the cost. I crimped 24 just yesterday with the only problems being a sore wrist today. The Powerpole insertion tool is cheap and while a small screwdriver will work, the insertion tool does assist with removal, if you ever need to extract a contact.
Jim
I solder all mine and never had a problem, I’m not a big fan of crimping, The crimping tools are not cheap from memory. There are a couple of good UTube videos on how to solder them. You have to be careful not to get solder on the blade of the terminal. I’ve now switched all my DC connectors to Power Poles and they are great.
Likewise have soldered a number of Anderson connectors without any problems. Just make sure there is not any excess solder splashed over the outer body of the terminals.
A small bladed screwdriver can be used to push the terminals in until they click into place.
Double check the polarity before doing so as they can be a pain to get out.
Me too. I have a wooden clothes peg glued to a small block of wood, with the ‘holding’ end filed to a convenient shape.
This lurks on the bench and is very useful for holding connector parts for soldering, including Powerpoles, BNC centres etc. The advantage of using a wooden clamp is that it doesn’t damage the plated contact surface…
Matt VK1MA has recommended some short bullet to (forget name) connector (2 per pack) so you can cut the connector off and fit powerpoles to the little lead, and not mess with the battery.
Better if you read why etc in the thread, but thought I’d mention.
Richard’s video is good - tinning the contact and the wire separately is the way to go. But don’t over-do the solder when tinning the wire and do not be tempted to add extra solder to top up the large volume a the back of the contact once the wire is in place. If you feed in more solder it will likely wick up the wire under the insulation. This will provide a point for brittle failure. I’ve had two fail this way, out of the ~10 I have had in use over the past ~1 year.
My preference would be for crimping, but the tool is a bit of an investment.
Ultimately you should be considering the type of wire and number of strands in said wire, the “crimp” terminal isn’t fussed if you solder it or crimp it IMHO.
Crimping has the advantage of revealing more stress and avoiding a brittle fracture. Soldering them is fine in most cases.
As an additional tip I reverse fill the back of the powerpole with hot-melt glue to provide some additional protection, hopefully.
Crimping is technique you have to learn and practice. The reason why many get a better result soldering is simple, they have had lots more practice soldering than crimping. And you often need the special (aka expensive) tool to do a proper crimp.
I’ve seen comments that Powerpoles can unplug with quite a light tug. Is this an issue in reality or just someone needing to find fault and not really a problem?
Thanks for all you tips and advice. Have gone down the soldered route and have fitted them to the battery, charger and radio power cable. All seems fine so will see how they fair in the wild.
I have found soldering, when properly done, provides the more reliable junction than crimping.
Particulary in joins that are exposed to the elements or rough usage in the field.
The Anderson plugs I have plug into each other with a noticeable click and if anything require a bit of effort to separate them.
I must have used 20 or 30 pairs of power poles and have soldered every single one of them and inserted them all using the small instrument from behind approach - I have used a variety of cable sizes from the largest ones that just fit into the connector (when using a spare / replacement cable for 100W radio) to small ones for very low power requirements and have had no problem with the connections to any of them.
When in use they do not take much of a tug to disconnect one from another, but I have rarely had that happen unless I’ve managed to tread on the cable or get a cable tangled up in my feet.
I’ve just put a pair of power poles on a Zippy LiFePO 4200mAh and it took some doing I can tell you. Well, it took some doing because I forgot something quite basic about Power Poles: the pusher helps a great deal. I used the normal PP15-45 housing, but with the 45 A contacts. This was the right choice in terms of contacts, my mistake was in trying to push the contact into the housing just by pinching the cable. That works with stiff copper wire, but with the soft 10 AWG silicone cable it just bulges and gets stuck in the housing. A small flat bladed screwdriver sorted out what was becoming a major headache, phew!
Good luck soldering that cable on the 4200mAh LiFePOs, I hope you have a blow torch handy.
Looking forward to trying out the pack tomorrow hopefully.
73 de OE6FEG / M0FEU
Matt
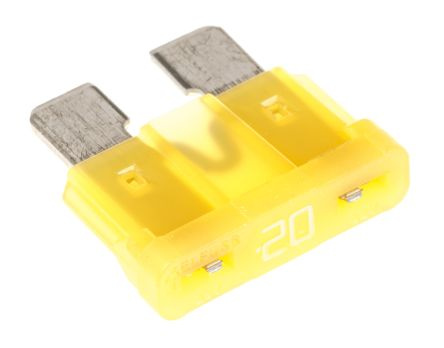
Install a fuse direct to one battery terminal. That battery can happily deliver 200A, just before the smoke is released. I use a 20A spade fuse
with car style spade terminals (little silicone applied grease to keep the corrosion at bay).
Incidentally I use 2 X 5Ah Lipos (each with a 20A fuse), parallel up to at the time of use to give me 2 Hrs of activation at 80W CW/SSB. My choice of connector is the XT40 but that is just me. Soldering is not a problem, 25W iron, a little flux and time required.
Well I have never had an issue with soldering Powerpoles or inserting the contacts into the housings using a screwdriver. They are excellent connectors. All of my 4AH and 2.2AH LiPOs are fitted with them with an in-line fuse to each one. When I use these batteries to power my 857D, I have a method of switching which only parallels them once they are required so that they are transported unconnected. I seem to recall I picked up this suggestion from John G4YSS. Maybe LiFePO4 batteries are more tolerant.