Off Topic: Trickiest repair you have performed

My laptop has an intermittent boot problem. If it doesn’t boot twist the case a few mm and up it comes. So it needs replacing. I decided to get something newer and faster and shinier and it’s great and works.

What to do with the old one? Well there are plenty of 2nd hand motherboards on eBay, some say faulty, some say working. My old laptop was an i7 and all the i7 motherboards were faulty. But there was an i5 worker for £13.50 in p&p. I have a new (to me) faster laptop, so a working i5 is more use than an intermittent i7 and the speed penalty is maybe 10-15% slower which you wont notice most of the time as it’s only 0.5dB :wink:

The motherboard came 2 days back and I finally picked up courage to do the swap having seen the webpage showing each step with pictures and watching the YouTube video.

To remove the motherboard is a 24step process involving

removal of: 3x M2 x 2mm, 5x M2 x 2,5mm, 15x M2 x 3mm, 27x M2.5 x 5mm machine screws

removal of: CMOS battery, hard driver/caddy, RAM, Wifi card + cables, fan, keyboard bezel, keyboard, palmrest, fan hinges, sticky pads, speaker cable.

disconnecting: 2x LCD cables, DC cable, power button cable, speaker cable, 3x touch pad cables, keyboard cable

Then you can lift out the motherboard and insert the replacement. Reassembly is the reverse of the 24 steps and I broke the speaker plug but with high gain glasses and 2x jeweller’s loupes I was able to bodge it. I thought I’ll probably need to buy a set of replacement speakers.I got back from step 24 to about 6 when the LCD cable would’t reach. Was the socket in a different place? No meat-head here had trapped the cable and so I had to disassemble back to step 21, free the cable about 3mm and reassemble.

Then evening meal was served so that was wolfed down and I tried it. Dead. Nothing. Not even smoke!

Undaunted I plugged the charger in and the battery light lit. I hit power and… I got a CMOS corrupt message. Hit F1 and it said “no boot device”. Reboot and up came the Dell logo, F12 and into the bios, set the time, take it out of secure boot, set legacy boot: USB then internal SATA, save the changes and reboot. Wait… wait… wait… Dell logo and GRUB menu and Debian 12 loaded. A quick check showed all USB ports work, 2.4/5GHz wifi, ethernet, everything seems FB.

At this point I was quite impressed at what I’d achieved in 90mins especially as I can see naff all if it’s smaller than a stock cube now. I don’t want to do it again but even the gubbed and jiggered with speaker connector worked as sound came from both speakers. I spent a good 15minutes on that.

Or as Brother Maynard would say “And the Lord did grin. And the people did feast upon the lambs, and sloths, and carp, and anchovies, and orangutans, and breakfast cereals, and fruit bats, and large chulapas…”

The trick is knowing where to push/pull/lever and how much force to use but that is one of the most involved repairs I’ve done.

The question is, have you done something more fiddly and involved ?
9 Likes

I replaced the windscreen in a 1972 Range Rover in the southern Libyan Sahara with a flat blade screwdriver, some engine oil and a bit of string.

Don’t ask me how I found a replacement windscreen for a 1972 Range Rover in the Libyan Sahara…

8 Likes

I rebuilt a Dell laptop once. Nothing difficult physically but what a beast to get up and running. Dell at the time (it may be different now) used lots of obscure drivers which weren’t included in the standard Windows distribution of the time. It took numerous deep dives into their website to find them all. The experience has put me off laptops for life. :slight_smile:

1 Like

Yes and although radio-related, it could just as easily have been a computer repair.
The Xiegu X108 20w HF all-mode radio - uses a micro-USB connector for serial CAT control rather than the 3.5mm jack in its later replacement, the G90.

The connections on that connector are SMD-sized and I’m not sure if it was ever soldered on, only the casing contacts kept in contact working. In any case after several portable activations both this had become intermittent and the OLED display had faded so much that it was no longer visible.

After sourcing replacement parts, while taking the radio apart, I also managed to break some of the RX-TX board interconnect coax cables as I had thought they were simply relying upon the push-on capabilities of their micro-coax connectors. Well, in two cases, one end was but the other end had been soldered on.
The end result was I had several very tricky soldering jobs!
To do this I bought myself a USB webcam-based “microscope” and a small soldering iron with very thin soldering bits.

After planning and thinking through which repair had to be done in which sequence, I started with the OLED screen only to find that the replacement part was faulty. I got it replaced and the new replacement worked fine. Then I moved on to the micro-USB connector and this gave me the most trouble. I was totally reliant upon the USB “microscope” and soldering based on what you can see on a PC screen while trying to move the iron very slowly, was a challenge. With that eventually finished - but it remained a bad design idea (I still have some extra SMD USB micro sockets for the next time this fails) I tried to replace the damaged coax interconnect leads. These onboard connectors are horrible to get to and the replacement cables were only just long enough for the purpose - after several attempts, I gave up and soldered thin coax in place board to board. They were soldered down in the original configuration so the change of an easy cable replacement in the future would be very unlikely in any case.

The whole set of repairs took about 7 weeks to do with set-backs and ordering new parts. In the end everything worked again but that is one set of repairs that I would never have attempted had I known what was ahead of me!

73 Ed.

3 Likes

Was this WinXP John? Since Win7, most of the drivers you need are signed and available in WIndows Update. So as long as your ethernet works (normally does unlike Wifi) you can install the basic ISO and reboot and tell it to go looking on WIndows Update. Worked fine for this desktop when I installed Win10Pro on it.

The hardest part of the motherboard job was the screws were so tiny and you’re never sure how the connectors disconnect and again are so tiny you don’t want to apply force. Or you break them like the sound connector.

2 Likes

I think it probably was XP, this was a few years ago. I’ve still got the laptop but it now has Unix on it but I haven’t used it for ages. I might dig it out and see if I can install WSJT-X on it for portable use.

1 Like

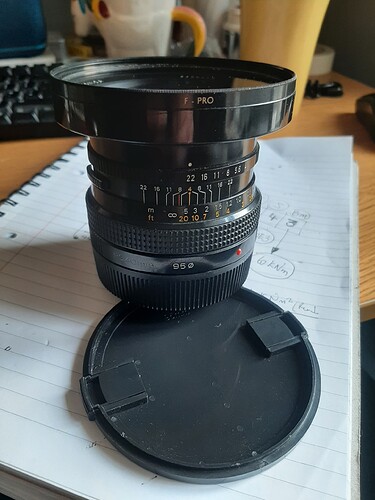
No electrons involved, but successful disassembly, cleaning and reassembly of this old Zenzanon-PS 40mm f/4 lens which had hazing on an inner element group. Applying huge amounts of unlocking torque, millimetres from vulnerable lens surfaces, using rudimentary tools was a bit stressful.

7 Likes

That’s impressive if you don’t have the special tools.

Technician wanted 200 euros to clean the beast. Bodged a lens spanner from some old workshop dividers - filed down the ends to fit the slots. Some rubber from a bicycle inner tube and wooden blocks for friction to open the inner groups. Acetone to dissolve the thread lock, isopropyl alcohol, de-ionized water, cotton buds and lens tissues for cleaning. Took plenty of photos during disassembly so it went back together the same way. It was unusable unless you had your back to the sun, now it’s just as good as I remember it was. I fear I may have voided the warranty. though :slight_smile:

6 Likes

Oh yes.

I recently updated the firmware on the Yaesu FTM100DE mobile rig.

End of thread - no-one will top that (as anyone who has lost a day to Yaesu firmware purgatory will testify).

4 Likes

Ah, firmware updates. I updated the Android firmware on a phone once. I’d heard so many tales of woe I practised on on an old phone first. That involved, unlock bootloader, install recovery software, backup existing firmware, erase Android, install new Android, install new Google apps. Reboot phone and everything was great and new and shiny. Took about 30mins. The best part… the phone used a chipset we had worked on for the manufacturer so I had extra info and was able to do the job at work under the guise of comparing performance of a chip simulation with the real thing. Nice!

Now to my real phone. Do the same. Doesn’t boot. Spend hours and hours trying to make it work. Oh well I’ve bricked my phone but the old one is now updated so I can use that. So many internet searches came up blank till I found one person with the same issue. It turns out that not only do you need the new recovery, Android and Google images but some of the software that never changes that drives the phone part of a smart phone needed updating. There had been an official update months back I skipped because I was going to put the “better” Android on. I needed that update and it would work. Only place I could get the image… a Russian image/driver site. In for a penny… The update was clean and worked and my phone booted the new Android.

This is part of what I do for my job, working on low level software etc. It took me all afternoon to recover my phone whilst actually working on real jobs. OK, I could have bought a new phone, it’s only money, but as this was the kind of thing I do for customers whose chips we’re helping produce, it was a matter of honour to get it fixed.

I can sympathise with your firmware update frustrations.

2 Likes

Fiddliest I think would be one of:

  1. Replacing the LCD screen on a digital compact camera
  2. Replacing the CCD sensor on another digital compact camera
  3. Replacing the keypad on a Nokia 5310
  4. Replacing one of the SMD fuses and finding/repairing an exploded PCB trace on a Yaesu FT817

1-3 were technically straightforward, just fiddly for various reasons including they weren’t intended to ever be repaired.
4 was difficult because I had to trace and find the fault then work out how to repair it but at least schematics are available and it’s easy to dismantle and reassemble.

1 Like

Did that on a Lumix TZ20. I’d cracked mine and found someone selling new ones on eBay for £12. It was straightforward to get the screen out of the case and disconnected. You had to twist the metal frame so you could remove the LCD itself along with the touch layer. Then reassemble frame and twist the tabs back. I was surprised it worked afterwards but again there was a YouTube video to follow. Same as the motherboard but the motherboard just went on and on and on.

That sounds much, much more fiddly. I’ve stripped that old TZ20 many times to clean crud off the sensor (before I upgraded to a TZ100). Changing it and not getting greasy thumbprints on the new one is what would scare me.

1 Like

I have an old naim streamer. It needed a necessary firmware update if I was to keep using it with various streaming services. Despite it having wi-fi and ethernet connected, I had to remove it to the room where my PC was, hook it up via an rs232 and very carefully follow the supplied instructions and video to the letter. If I didn’t, it would be turned into a very large brick.

Update was sucessful. Not only did the streaming services work ok, but their engineers had played with some of the settings, improving the sound and presentation of the device.

1 Like

The anti-bricking system on a major EU manufacturer’s car dashboards was done in great detail so they could do over-the-air updates to the cars. OTA so you didn’t have to take to a dealer but smart enough to not do an update while driving!

It basically had two complete sets of FLASH , image A and image B. Plus bootup FLASH. When it came to load the actual software it looked at which set of FLASH was in use and then a checksum to make sure the image A matched the saved checksum. If it did, it loaded A and off you went. If it failed it checked B and would use that. So you needed a lot of fail before neither would load. If A was in use then an update would go to B and it would try that. If it failed, it went back to A and reverted B to the same A.

Great lengths so that OTA updates can be done and recover from problems and not leave you stranded. I’ve not heard of them doing OTA updates… someone in marketing/PR is concerned of the bad publicity if it fails so updates get done OTA when the car is parked at the dealer’s forecourt. When you wont see the staff running about like headless chickens trying to fix your car!

2 Likes

Furthermore, the firmware update process for the FTM100 has physical fiddly bits to do as well. There’s a tiny fiddly switch through a small hole in the main rig chassis that has to be put into the update position with a toothpick, and an even smaller and almost-impossible-to-see one in the detachable front panel. So small and black and hard-to-see that I spent half a day in depression convinced that I’d trashed it with my well-reported “clumsiness” and the little black switch was floating around the panel somewhere, rather than still attached to the PCB. Imagine my joy when returning to it some hours later, with a headtorch, a magnifying glass, and renewed determination, to find it intact.

Plus with the current generation of Yaesus, there’s typically three firmware updates that must be done (eg MAIN, PANEL & DSP), each of which must finish the previous update by shutting down, removing all cables etc, then reversing that, putting them back in (but usually in a slightly different order to last time). Each of these requiring further cocktail stick and magnifying glass sorcery… And all must be fully completed before the rig will work again!!!

I have to conclude that I am utterly DELIGHTED that the FTM100D is no longer in Yaseu’s product line-up or supported. This is a guarantee of NO MORE FIRMWARE UPDATES - woo hoo!

4 Likes

Changing the display bulb on a Yaesu FT290R (original version) many years ago - not something I think I could manage now.

1 Like

For me the trickiest repair I’ve done is a choice between changing the bulbs in the radio display in the dash of a mk4 Astra or the third motion shaft double bearing in my Mum’s Austin 1300 gearbox.
Both feature a lot of preliminary dismantling to get to the problem.
Andy
MM7MOX

1 Like

For me it was changing the rear seat latch on a Volvo estate. Strictly speaking the actual “changing” was easy. The fiddly bit was dropping the seat without a functioning latch to give me access to make the swap. That took about an hour and several expletives. The repair then took less than 20 minutes!

2 Likes

I’ve had a few minor issues like the links on my links on my dipole coming off and one leg of the dipole coming away from the Coax. But easily fixed.

But operating from the top of Scafell Pike one winter I dropped my morse key and the lead caught on something and parted company from the morse key. At home it would be an easy repair. But this key needed an alum key to get inside the case. And i discovered I didn’t have one.

All I had left was a couple of feet of wire with the plug on the end. I stripped an inch or two off the opposite end of the 2 wires. I held one of the bare wires down with one finger and held the other bare wire with my thumb and forefinger of my other hand I found I could still send by pressing the bare wires together. It wasn’t pretty listening to the results but it worked.

1 Like