A New Spring Hat
Novel designs and testing of capacitive hats for portable amateur use
Scott Schillereff, VA7SNJ — Victoria, BC, Canada
Improving on small and light
For portable operation, many amateurs use electrically-short (<1/4 w.l.) telescoping whip antenna systems; they are small and light. Top loading (“capacitive”) hats improve the performance of such antennas, primarily by (a) raising the RF current profile along the whip, enhancing antenna radiation efficiency, and (b) increasing electrical length (thereby lowering the resonant frequency and expanding the spectrum “reach” of the whip system). Hat benefits are well-described in the writings of R.L. Cebik W4RNL, and the excellent SOTA post by Ignacio Cascante EA2BD Cap hats for whips & short verticals: get more with low effort).
This post summarizes my experiments with different hat styles, along with test results and analysis, and presents a novel, light-weight hat design (Spring Hat) which is well-suited for portable use. This is the short version; all the data, photos, and construction steps are presented in the full document here: https://docs.google.com/document/d/152PGa4th6Ef8NdaS2gbA8eZHoCPeywov/edit?usp=sharing&ouid=100768873104719149298&rtpof=true&sd=true
Many thanks to Peter Dittus, HB9EBE, for his helpful comments on organizing this article.
A hat wakes up a whip
Here are the headlines – the % of RF current measured at the tip of a whip compared with current at the whip base is greatly increased when adding a hat.
| Hat Configuration | RF current at tip relative to base of whip | vs. no hat | |
|---|---|---|---|
| No hat (bare whip) | 23% | 1.0× | |
| “Pumpkin” hat | 52% | 2.3× | |
| Solid disc hat | 58% | 2.5× | |
| “Butterfly” hat | 68% | 3.0× | |
| Hex hat | 74% | 3.2× |
*All hats are described in the full document.
Every hat more than doubled the current at the tip, and the Hex hat more than tripled it.
In addition, tests showed that these hats dropped the resonant frequency of the bare whip down by ~1.5 to 3.6 MHz, with the Hex hat showing the greatest decrease (−3.64 MHz). That degree of frequency shift corresponds to an effective electrical lengthening of the whip by 1.67 m (5.5’).
Finally, bandwidth measured with the hats was equal to or slightly lower than that for the bare whip (900-1100 kHz). This range is still broad enough to avoid retuning when operating in the CW or SSB segments of HF ham bands.
It’s clear that any hat beats no hat.
On-air propagation tests flopped
In an attempt to confirm hat benefits with on-air performance, I sent batches of CQs with and without the Hex hat and retrieved spotting results off the Reverse Beacon Network. At first, comparative results looked promising — one spotter reported a 6.9 dB signal strength increase with the hat. Break out the champagne? Not so fast… Other spotters reported decreases in signal strength with the hat.
Further inspection revealed the villain was not the hat, but rather short-term variability in ionosphere propagation. One station logged me at 37 dB signal strength but, just ten minutes later, at only 9 dB — with absolutely no changes at my end. At times, skywave propagation can fade faster than you can finish sending your CQ. I conclude that these far-field spotting results using the RBN simply could not see hat effects through all the natural variations. So, I’m calling the RBN tests a bust.
Hats using 304 stainless steel spring wire
I experimented with a variety of hat shapes and configurations using 304 stainless steel spring wire. Such wire is readily available online in precut lengths. For me, the optimum diameter for hat building is 0.8 mm.
Two of the hats (“Pumpkin” and “Butterfly”) were built by forming circular ribs of flexed spring wire equally distributed around a hub, and attaching a perimeter wire around the outside. With multiple ribs, these 3D hats resembled a torus shape. While elegant to look at, they did nothing special electrically; they behaved just like flat hats of the same width.
The photos below show the hats I tested.
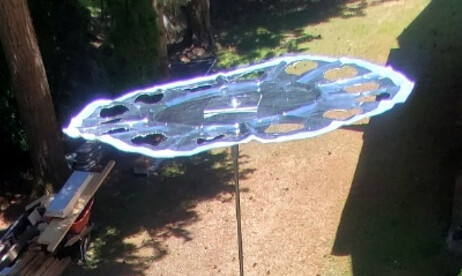
For comparison, a solid disc made from a disposable aluminum oven liner
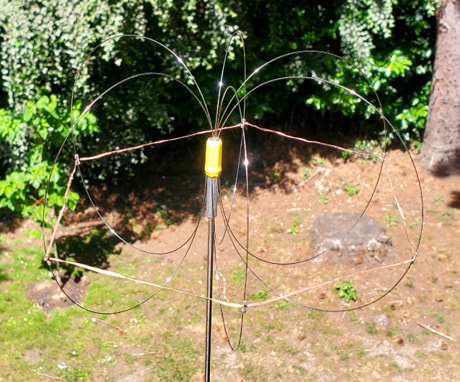
The “Pumpkin” hat - six flexed spring wire ribs with perimeter wire
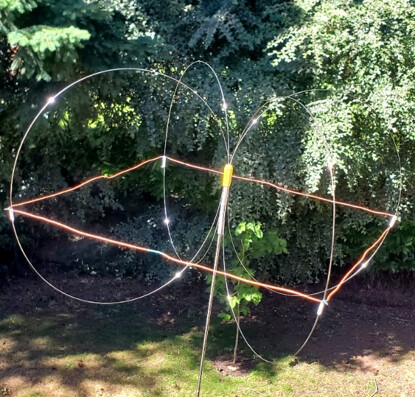
The “Butterfly” hat – four double-length spring wire ribs with perimeter wire
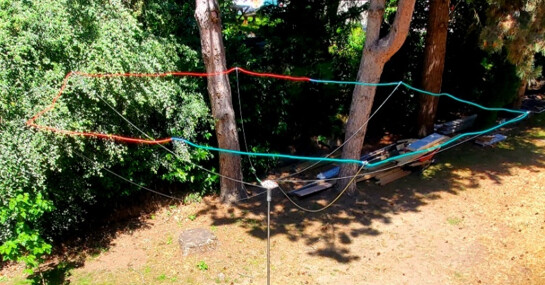
The Hex hat – six spring wire spokes gently bowed by perimeter wire
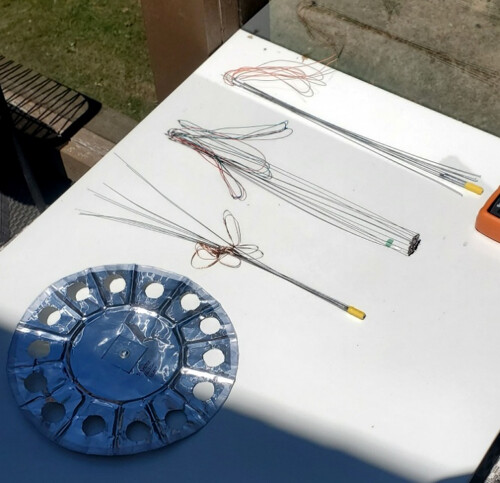
The four hats collapsed before testing. L to R: solid disc, Pumpkin, Hex, Butterfly.
Comparing relative RF current profiles along the whip for the different hats shows that the strongest factor affecting hat performance was hat width - specifically, the distance from the hub out to the point where the RF current is zero. For the Hex hat, this was taken to be the spoke radius plus the distance to the midpoint of the perimeter wire between spokes. The greater that distance, the more influential was the hat.
New “Spring Hat”
The Hex hat configuration was most influential, so I used that as the basis for my new “Spring Hat”. Full construction details and photos are presented in the full document. The photos below show the Spring Hat deployed and collapsed for storage (screwed to tip of collapsed whip).
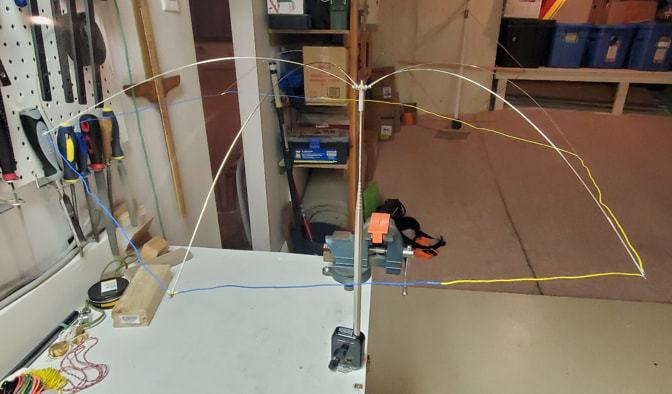
The finished Spring Hat, deployed on the whip — push a couple of spokes down and the whole umbrella shape snaps taut.
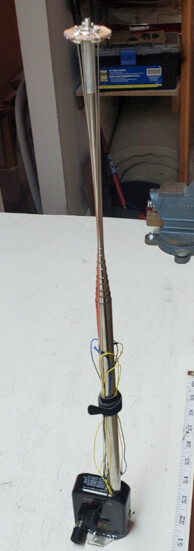
The collapsed Spring Hat, stowed on collapsed whip for transport or storage. Spokes and perimeter wire gathered and held with small Velcro strap.
Spring Hat vital stats:
● Total weight: 14 g (0.5 oz); full width: 70 cm (27.6”); collapsed length: 40 cm (15.75”); perimeter wire length: 210 cm (82.7”); total materials cost: CAD$10 (€6.2 / US$7).
● Six radial spokes on a reversible PCB hub. The hat is stowed screwed onto the tip of my collapsed whip. To deploy, I unscrew the hub, flip the whole hat over, let it flop open, and snap it down into a self-supporting umbrella shape (takes under a minute).
● Perimeter wire was permanently attached to the spring wires with a novel, low-profile “impaling” connection, without chunky connectors.
● This is an intermediate-level build — you will need is a bench, basic hand tools, a drill, a soldering iron, and the ability to shape FP4 PCB material (for hub) and make the impaling connections.
This hat is always assembled (no bits to lose or fumble with in the field); just “flip, flop, and fly” (on top of your whip)! If this intrigues you, I encourage you to read the full document. If you have questions about building one, please respond on SOTA reflector or reach out directly to Scott dot Schillereff at gmail dot com.
Happy building!
73, Scott VA7SNJ