Hello SOTA mates,
My first QRP rig was a FT-817. I owned this nice rig for some years. Last year I decided to search for an alternative HF rig, even smaller and capable of SSB + CW.
Among the large list of models on disposal, one caught my attention; that was the LD-5 from LNR Precision Inc, based in USA. They are suppliers of several different QRP rigs, like the tiny CW MTR (Mountain Topper), a versatile multiband rig pocket sized.
I decided to sell my old FT-817 and buy one LD-5, mainly because of its less weight and higher output power (8 watt max).
LD-5 includes 5 bands (40 to 15 meters HF). For those who wish having the whole HF range there is another version called LD-11.
I did a search for reviews of this rig but there is little published on the web appart from an ARRL test. After having purchased and tested the LD-5, due to the fact this rig in not very known here in Europe, I decided to write this review.
Disclaimer: I am not connected in any way with LNR precission, and don’t have any professional or personal relationship with any of their crew. The review published in this article was performed at home with basic amateur equipment not callibrated, and my conclusions are drawn as for reference. This is not a profesional work.
xxxxxxxxxxxxxxx
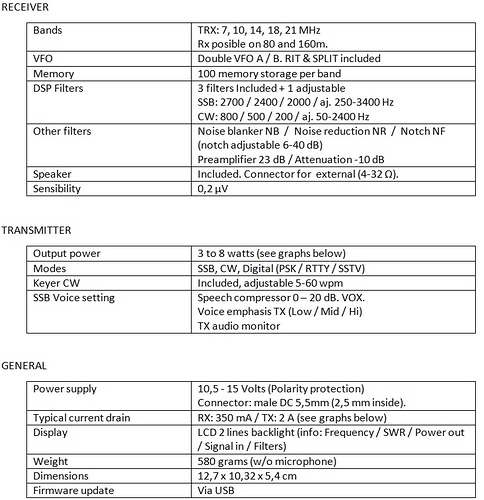
1. Specifications
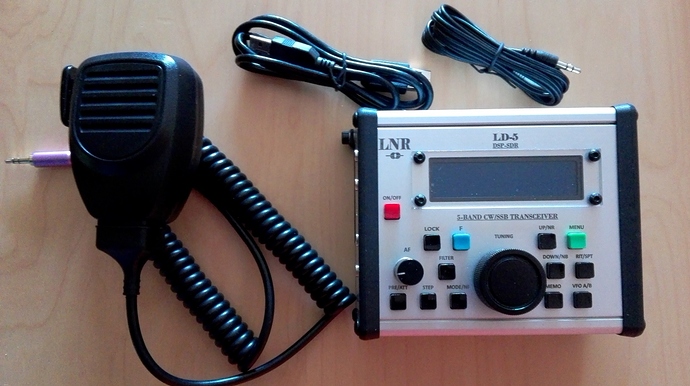
Right after opening the box I got the transceiver, a hand microphone, USB cable, an stereo cable for PC sound card and a single sheet basic instructions:
A full manual can be downloaded from LNR Precision web page.
2. Connectors
Connectors are placed in both sides of the rig. They are standard 3,5 stereo Jack, apart from the power plug, USB and antenna connector. There is a little hole tagged “MONI” to adjust the CW side tone volume monitor with a cross screwdriver.
Puss buttons:
The rig has a lot of direct setting buttons placed in the top panel: 13 function buttons and 2 jog wheels.
• Tuning step is adjustable between 1 Hz / 10 Hz / 100 Hz / 1 kHz / 10 kHz (by default, every time the rig is switched on the step is reset to 1 Hz).
• Volt Monitor: press F + Menu to see on the display. It’s very useful to check the status of your battery while activating portable.
• VFO A/B: when you qsy between VFO “A” and “B“ the mode doesn’t change automatically, instead the last active mode is mantained. I.e. if you are on 7.032 CW, when changing to VFO B you are on 7.118 but still on CW instead of LSB. You then need to press Mode to change to LSB.
3. Receiver Current drain (at 13,8 V power supply)
The receiver draws about 350 miliamps with a normal volume level, all filters disabled and the display backlight on.
Let’s see the current drain variation while engaging other features:

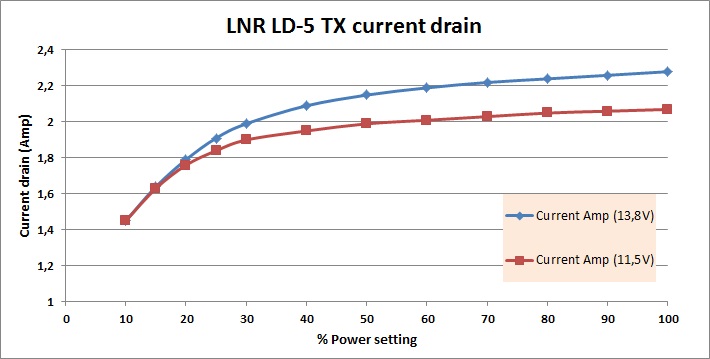
4. TX Current drain (Amps)
You can modify the output power in a range between 10% to 100% (Menu Power TX).
I performed two different tests, one feeding the rig with 13,8 Volts (external power supply) and another feeding with 11,5 Volts (with a 3 cell LiPo battery). Here the measurements:

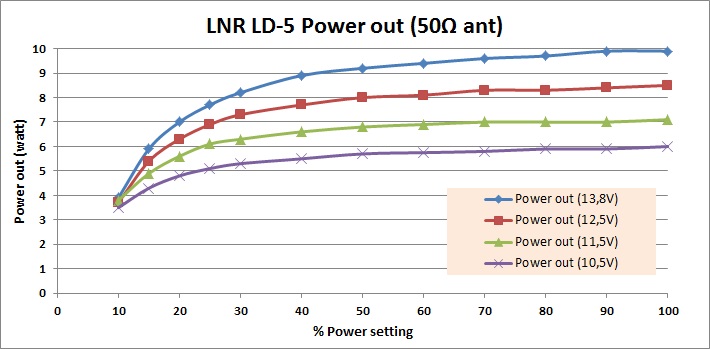
5. Output power level (watt)
Here we can see a graph showing the output power achieved when adjusting the rig between 10’% to 100% and feeding with 4 different voltage levels:
Below 10 Volts the rig has malfunction.
When feeding the rig with 13,8 volts, the rig heats during long transmision periods. The final transistor is tied to the chassis opposite the top panel. Ventilation of this spot is recommendable.
6. SWR and power output self-protection
LD-5 self-protects when there is a high SWR level, by reducing the output power.
Both SWR and Output power can be seen directly on screen by activating the Menu “Show TX” (SWR / Power) and adjusting the display format in the Menu TX Meter (Number / Scaler).
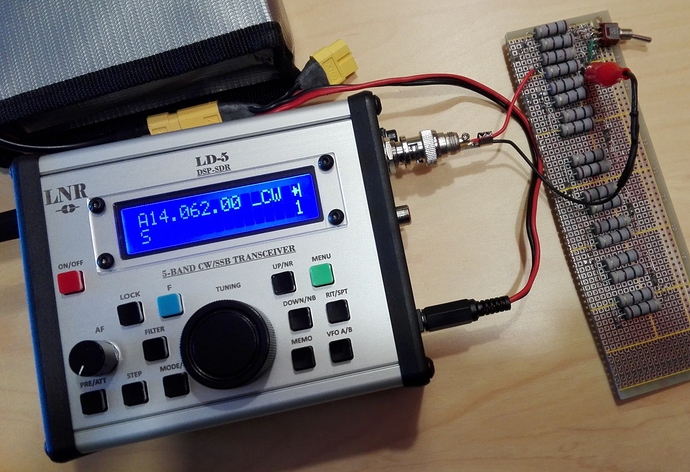
In order to measure the SWR an external dummy load made with non inductive resistors was connected. The test was done with a power level set to 5 watt. The resistors in the dummy load were carbon film. By connecting a wide range of resistors I simulated different impedances, between the ideal 50 ohm load up to a maximum of 400 ohms.
In the picture you see the testing device. Resistors are placed on a board along with a crocodrile clip to set the required impedance in series with the antenna connector:
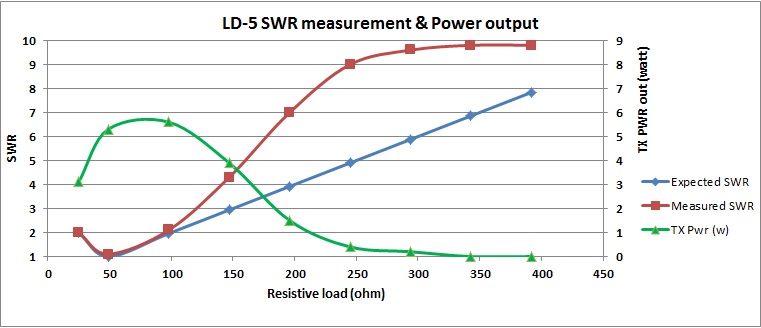
The graph below shows SWR variation (left hand scale) depending on the resistors connected to the rig and the output power (right hand scale):
Remarks:
• SWR measurement is correct between 25 to 100 Ω. Nevertheless, as the SWR increases the rig reads values much higher than the present ones (see the difference between red and blue lines).
• Such wrong SWR readings produce an excessive output power decrease (self protection system). In example, when the rig reads a SWR of 4,3:1 the resistor is producing only 2,94:1. Such issue reduces power to just 73,6%. This error increases more and more along with higher SWR readings. It is imperative the use of a true 50 ohm antenna (resonant) or a Tuner to avoid this trouble.
• There is an odd power increase when the load is 100Ω: there the power increases to 105%.
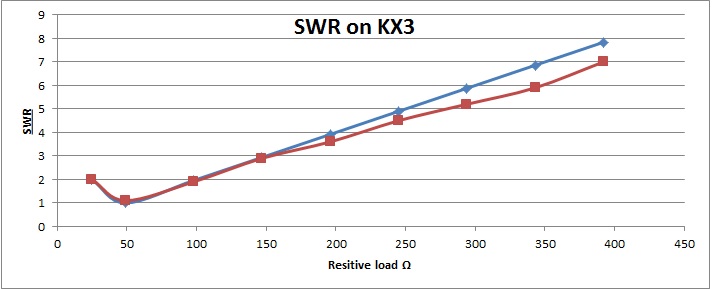
In order to check whether the resistors used for the test were accurately measured, I performed a second test using an Elecraft KX3:
We see a much better correlation between the theoretic and measured SWR values on the KX3. This confirms the SWR reading bug in the LD-5 and therefore the excessive power reduction on its self protection system.
7. SSB Tests
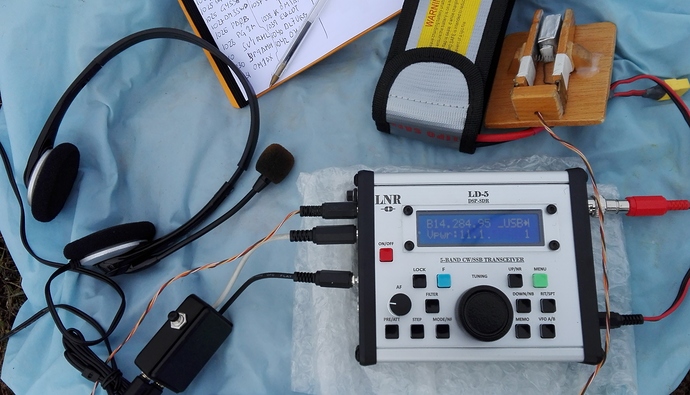
The supplied stock microphone is quite big and heavy. Instead, I prefer to carry an external headset when operating portable. The reason is I can concentrate and listen properly weak signals in the open air. In addition, when using the radio on a mountain top, the noise can be annoying for other mountaineers. To add one more reason, having both hands free while using the headset microphone is great to log or tune the radio.
For all these reasons I prefer to use a simple and cheap headset for PC with the radio.
LD-5 has two 3,5mm stereo jack ports for headphones and mic input and looks like compatible for such standard headsets.
Nevertheless, the first testing wasn’t good. The lack of a PTT button makes mandatory the use of the built in VOX control, and the adjustment of the mic sensitivity (VOX gain) is complex.
Maximum VOX gain level is 100: that setting would require a too high speech volume to trig the transmitter. A lower value of 50 to 60 enables an adequate speech level when using it at home. If we set to a lower level the transmitter performs a very fast flicker behaviour alternating between receive and transmit.
The first time I used the rig on the countryside I couldn’t set a proper level to avoid such unstable behaviour. VOX seems to be quite sensible and critical in this rig.
To get rid of the VOX I built an external PTT switch, and therefore disabled the VOX setting it to 100 level. This homebrew adaptor has a plug for the headphone, another for the mic and a PTT switch.
Diagram:
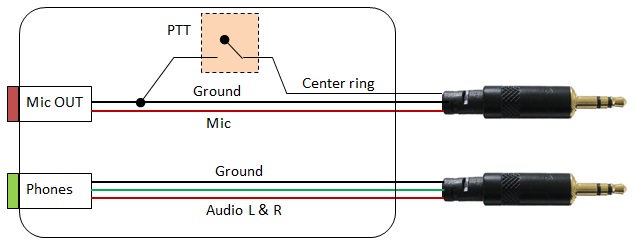
To activate PTT join center ring and ground in the Mic plug. The small adapter finished:
With this adaptor I got good reports on SSB with a external headset.
Concerning the built in filters, NR, NF, Preamp, they all work excellent, doing a fine job.
8. CW Tests
To make CW work you need to enable the menu “CW Vox”. You have to set to at least 100msec.
CW pitch tone adjustment is done in the menu “Pitch CW”: 400 a 1000 Hz.
Audio quality in CW mode is excellent on this little rig. You just need to be careful on the cw Filter selection (adjustable from 1 to 4) because if you set the higher ones (3 or 4) the selectivity is too narrow. Let’s make a deep analysis on this point.
8.1. Comparison of CW filter levels:
A comparison of the audio spectrum has been done to show the response of an Elecraft KX3 and the LNR LD-5 side by side. All measurements have been done with the Preamp off in both rigs, listening on a quiet frequency without any qso in progress.
The filter is progressively adjusted on the KX3 to narrow the audio passband. Filters shown in the first graph are 800 500 300 y 200 Hz. The graphs are done using an Audio spectrum software on a computer and connecting the receiver directly to the PC soundcard:
The second graph shows the LD-5 audio spectrum with Filters levels nr. 1, 2 and 3.
- Remarks:
By looking at the comparison of both spectrum, the LD-5 has a narrow audio passband whichever the Filter you select. Observation showed that the Filter nr. 1 on LD-5 is about 300 – 400 Hz, Filter nr. 2 around 250 Hz and Filter 3 about 150 Hz.
This could confirm the reason why the CW audio on the LD-5 is so silent and comfortable.
I wouldn’t recommend the use of Filter nr. 3 for general purpose operation (Filter nr. 4 is even set narrower), instead that would be a good choice only in crowd band conditions like international contests, where it is necessary to clean the uncomfortable adjacent splatter.
An interesting alternative would be to set the Filter nr. 4 a bit wider than nr. 1 so that the passband could be opened up to 500 or 600 Hz.
Last, we observe some curious audio peaks on the left hand side of the LD-5 graph, on very low frequencies. Probably, such peaks identified by the software remain non-audible by human ear as they lie much lower than the CW tone at 650 Hz.
9. Conclusion
The LD-5 transceiver is a good choice for a portable rig all mode (SSB / CW / DIgi). Let’s summarize all pros and cons encountered during the review:
• Pros:
- Small and lightweight.
- Clear and bright display, even under direct sunlight.
- Enough function buttons (menu access just required for Power / CW speed or other main settings).
- Audio quality and loudness of the built-in speaker.
- SSB voice compressor adjustable.
- 8 watt max output power adjustable.
- Built in S meter / SWR / Pwr / Batt voltage (further details in the Cons list)
- Upgrade of Firmware via USB.
• Cons:
- Wrong SWR measurements leading to excessive power reduction while it wouldn’t be necessary with an acqurate measurement on the rig. That makes the use of a proper 50Ω antenna mandatory, or to carry an antenna Tuner along if the antenna is not truly resonant.
- Difficult VOX adjustment if you use a basic headset. Building an external PTT is necessary.
- Tuner step size resets to 1 Hz everytime the rig is switched off.
- Changing VFO from A to B between SSB and CW modes doesn’t change the mode automatically.
- Lack of CW message memories (a CQ call memory would be a nice add on).
End of review.
xxxxxxxxxxxxxxx
Here you are. I enjoyed doing this review using a simple multimeter, arranging the adjustable dummy load and preparing these bunch of nice and colorfull graphs.
I will keep on using this rig when I want to activate combining SSB and CW. I like its audio very much. I used it along with my EFHW antenna and had a proper SWR level so far without any Tuner, therefore no power issues.
Please feel free to add any feedback or aditional info.
VY 73 de Ignacio
Ps: if there is any huge grammar mistake or any other misspelling please let me know to update the text, as english is not my mother tongue.
