End Fed antenna configuration

Looking for advice on how those of you with more experience with end feds configure the antenna and perhaps the pole as well. My end fed antenna experience is limited.

Background: I plan to activate Utah summits on significant hikes over four days in July. I will be using my lightweight setup with a lower mast (~16’) and a new Par end fed 40/20/10 to upgrade from a mono band 20 meter sometimes used in the past and hopefully access closer locations.

I use a V configuration with a typical dipole or sometimes the end fed. In my typical operating locations I can strap a pole to at least a dead juniper trunk, bush, or boulder or use the V to hold up the pole. However, it appears these summits are barren, and I do not see the end fed as conveniently holding up the pole.

If I can build a small pile of rocks or find a crag I will use that. One summit has a structure that I will tie the pole to. I am guessing the most convenient will be running the antenna straight up the pole then pulling it out in a lazy inverted L configuration. I will only have 4 watts (all cw) and want a decent antenna configuration.

Any advice would be appreciated. I am confident I can activate most of these summits by VHF but I want to make sure I am effective on HF as well.
Brent Kg5auu

4 Likes

For summits where there is no fence post or tree stump etc, I take along a surveyors tripod with the theodolite mount removed, so there is just a hole for the mast to go through. I also have a piece of wood with nails in it to fit around the base of the mast and a couple of holes to put tent pegs through the piece of wood into the ground.
Another alternative I have when there is a bit of a climb/walk is a modified photo tripod with radial wires and a loaded mobile HF whip. My favourite is the Komunica Power HF-PRO2-Plus-T as it packs small but still operates well on all the HF bands. Probably not as good as your Inverted-V dipole or EFHW, on a mast, antenna though.
Given your 4 days of hiking, I would take this second configuration. Everything packs into a small rucksack.

Compromise is the key.

Good luck.

73 Ed DD5LP.

I normally do 1 of 3 setups. First I go with an invert “L” configuration. Set the mast up close to the operating position and have the wire up and then out to a high point. If not high point then sometimes my hiking pole.
Another setup I tend to use is an inverted “V” as well.
And lastly, using my hiking pole as a strain relief / high point to the mast in a sort of sloper.

Malen
VE6VID

1 Like

If your pole is made out of glass-fibre, I suggest inverted-L configuration, using your 12m long EFHW antenna. If the pole contains carbon, inverted V is better, because it doesn’t run parallel with the pole.

I hardly ever need a fence post to attach my pole but use a cheap fishing pole holder, mostly without any guying, see: HB9EAJ – HB9SOTA

Have fun an 73, Stephan

4 Likes

In the terrain without trees or bushes I tension my mast with such a sleeve.

grafik

But you don’t necessarily need a sleeve. You can also do that with Velcro tape, for example.

Otherwise, I always proceed very pragmatically and see what the terrain offers. The first look looks for the place where I want to sit… then I look how the associated antenna place looks like and build up what fits.

73 Armin

2 Likes

Hi Brent,
whenever possible, I’m using exactly the same setup for my activations. At the far end of the wire, I put a walking pole to have a minimum distance of about one metre above ground. It works well and even with 3 watts from a MTR 3B I was able to create small pile-ups on 40m.

Good luck!
73, Roman

1 Like

Thank you for the comments. Very helpful. Looks like there are good options depending on the terrain.

I see that use of the trekking poles is common. I had considered using those to create a tripod with the mast but not to keep the end of the antenna higher. Are you just sticking the pole into the ground then tying the end of the antenna to that pole? I will be using trekking poles for these hikes so that would be feasible as long as I can place the pole in a sturdy configuration.

Yes, but in addition (to keep the pole vertical) I use one or two short pieces of string in the opposite direction and fix them with tent pegs in the ground

1 Like

Making antennas is one of the most rewarding aspects of the hobby. An invaluable resource for end-fed variations is this site. Have fun!

73, Steve K9NUD

3 Likes

Thanks. I made the 20 meter from a sotabeams kit but haven’t ventured into end fed construction behind that. The impedance has been a hurdle—I haven’t gotten the technical aspect down yet.

Very good. Thanks.

It’s really no biggie. Just order some toroids and enamel wire. The 49:1 and 64:1 variations tend to use the 43 mix (FT240-43 or the smaller FT140-43). The Earchi 9:1 unun uses a T130-2 toroid. Buy a few of each. Buy several of the FT240-43. They are especially useful for 1:1 and 4:1 transformers. Get some 18-20 ga. wire (enameled or plastic insulation) and some zip ties. You can put it in a box, or you can saw out some winders from plastic cutting boards and zip-tie the toroids to the winder. That’s what I do.

There are few things as satisfying as using things you’ve built with your own hands. I built a QCX Mini last week and it’s been tons of fun. I built a W3EDP “Junior”, with a 1:1 and a 4:1, along with some 300 ohm twin-lead. It tested fine in the back yard, so now it’s in the go-bag for my next portable op.

Cheers!
Steve

Thanks. I will have to look into that. I have made choke baluns on different toroids but never studied making a transformer.

Great photos on your site.

1 Like

Brent,

Here’s the low-down on how to do it really light, and still make lots of contacts on many bands, on high peaks without trees, etc.,

  1. A 16-foot pole is OK. I use a “7M” pole, sometimes fiberglass, sometimes carbon. Whatever you choose should not weigh more than 1 pound.

  2. Use an inverted-L configuration. You sit near the bottom of the pole, and the fed end of the wire runs up the pole, but it’s spaced away from it by several feet, most of the way up to the tip. The wire’s tension bends the thin upper segments of your pole out sideways, so very little of the wire runs close to carbon fiber. Let the pole bend as it will. Forget the doubters - carbon is great, it’s light, and it’s elegant!

    2A) Use thin wire - I use #24 AWG teflon stranded. Heavier wire overloads the pole and is a disaster!

  3. Run the wire out horizontally, or even sloping down, to whatever you can tie to. On alpine summits high above treeline, this may be a pile of rocks, a rock outcrop, or a hiking pole.

  4. Mostly I use 65 feet of wire (total). This is a half wave on 40M, full wave on 20M, 3/2 wave on 15M, etc. You can use a shorter wire as long as you can match it. Sometimes I use 52 feet with my tuner.

  5. I use a homebrew tuner that can match my wire on all bands 60-40-30-20-17-15M. Using it is really easy, but building it was challenging. There is an old post on here about my tuners. Mostly I don’t use or need a counterpoise, but it’s helpful on 60M. I use 12 feet. With shorter wires, you may need a counterpoise.

  6. The KEY POINT is that you can guy the pole much easier than you can carry any kind of tripod or other supports.

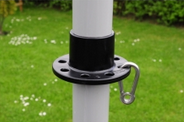
    A) As you extend your telescoping pole, wrap a thick rubber band - or 2 - several times around the pole, so it will be 5 or 6 feet above the ground, once the pole is up. On my poles this is usually the top of the third segment. It must be snug, so it won’t slip down.

    B) Lay out three strings or cords on the ground - I use braided dacron about 2mm diameter - each 15-20 feet long. Lay them roughly where they will be when the pole is up. Experience will guide you after a few times.

    C) Tie at least two of the strings around the pole, above the rubber band(s), with the pole still on the ground.

    D) Gather a few rocks to place around the base of the pole, so it won’t get pulled sideways once the pole is up and under tension.

    E) Tie two of your guy lines to rocks located 12-15 feet or so away from the bottom of the pole.

    F) Attach your wire to the tip of the pole. I use a fishing snap-swivel - it’s so easy.

    G) NOW raise the pole, and adjust its position so it will put some tension of the two lines that are
    already tied to rocks.

    H) Now you have a choice - do one of the following:

    I) With the pole standing, holding your antenna wire, quickly pull your wire out in the direction toward where it will be tied. If you are quick, the pole will stay under up and under control, and you can tie off the far end of the wire. This may be all you need, or perhaps you may need to adjust the rocks at the bottom of the pole, or adjust either of the two guy lines. This method is fast, but it works better if wind is light.

    J) If the wind is stronger, tie a third guy line above the rubber band, before you raise the pole.

    K) Raise the pole, and run the third line out to where you plan to tie it, and tie it off so the pole is standing OK.

    L) Adjust the rocks at the pole base, so the pole base will stay put and not swing out under tension.

    M) Take the string tied to the far end of the antenna, walk out to where you plan to tie it, and tie it off. I use 15-20 feet of small dacron line, sometimes much more, so I can choose from the available supports. These are often just rocks, or cairns. Don’t worry much about how high the end if the wire ends up!.

  7. Make any adjustments needed, tune up your antenna, and get on the air!

All of this is easier said than done, but practice makes perfect. You can put up a guyed pole in strong winds that will make the wire sing, and the pole dance and moan! High winds mean more attention to detail is needed. In particular, choose a spot with less wind, hopefully not right on top of a windy peak. Set up downhill, in the lee, even in the rocks 50 vertical feet down! You want to stay on the air and be comfortable! On HF you will work many stations seemingly through the mountain!

The more you do this, the more you learn how to get by with less effort! Some guys slope the pole at a low angle, and just use rocks to hold it up, no guys. This works OK too, and it’s quick.

If it’s really rough, use only a few of your larger pole sections, and use 3 short guy lines. Try to get part of your wire up 10 feet. Only a part of the wire need be above the ground, or above the rocks. In really high winds like we have above tree line, around 3600M here, you may have to put rocks ON TOP OF YOUR WIRE to keep it under control. With a tuner you can still get a good match, use several bands, and get amazing reports, never mind that the antenna looks like a joke, with much of it hardly elevated at all!

After doing it a few times, you’ll wonder why anyone would do anything else. It only takes a few minutes, even on a pile of talus. Remember that at high altitude, for SOTA, less is more.

With an end-fed and a tuner, you don’t need more than 2 feet of small coax from the radio to your tuner - NEVER MORE!!

The bottom line is that all you need to guy your pole is a few small braided lines and a couple of thick rubber bands, and some rocks you find on your summit.

73

George/Carey
KX0R

13 Likes

You might find that the end-fed wire will indeed hold up the pole conveniently.

The description of this end-fed antenna from Sotabeams shows a reliable method of deploying one using a fiberglass pole without strapping the pole to anything solid. Take a look at the diagrams under “typical setup.” The main difference from your inverted-L configuration is that the radiating element forms two out of the three guy lines necessary to hold up the pole, with the third being a regular guy. Your operating position would then be close to the end of the radiating element “guy” rather than at the base of the pole.

For my setup I’ve replaced the small insulator that attaches the wire to the pole with one of these guying rings. I have then tied a regular guy-line to the opposite side of the ring from that to which the antenna wire is attached. Deploying the antenna is as easy as pegging out the two ends of the radiating element (allowing sufficient slack for the height provided by the pole); lifting the pole and positioning it so that those two “legs” are taut; and then pegging out the guy-line to hold everything in place.

I think this would work with an EFHW antenna. You would need some means of pegging down the wire at the point it exits the transformer box, and you would then use a short piece of coax to connect to your rig.

2 Likes

This has a lot of helpful information George. Thank you. I am going to be reviewing it further. I especially like the process for guying. Rubber bands sounds like a great idea. Icicle hitches are to cumbersome on a peak. I have some very thin Dyneema line that I am going to use. I discovered my pole for this application is 6 meters and less than 11 ounces (Sotabeams) but I do not use the top section.

I do not have a tuner for the qrp rig and have studied your tuner design before—that’s probably beyond my capability right now in truth. But at least now I can quickly change between 40/20/10 bands now. Some of you are very nimble at that. I never have been.

Thanks Richard, I will look at that too. One thing I like about V configuration is it get the high current portion of the antenna at the apex.

3 Likes

The Emtech ZM-2 tuner is a great choice. It’s not too big or heavy and it’ll match almost anything. From a bit building perspective, it’s quite easy.

1 Like

[How to set up an antenna on a barren mountain]

My idea for such summits is to leave the pole in the backpack, extend it with the feedpoint at the top (coax cable going down to you, the backpack and the radio) and to weigh down the far end of the wire e.g. with your water bottle (the wire suitably extended by rope so as to have a minimal height above ground - I try to have it 1-2 ft above ground at least). As you can only extend or retract the pole and have to stabilize it yourself at all times, you’ll have to lay out the wire / rope / guying weight beforehand, estimating where to place the weight. Too far away, the tension on the pole is too high, too close, the wire will be limp or on the ground.
The pole leans against you or over your shoulder. It should be as vertical as possible with as little pressure on you as possible, but not fall over either. The radio is usually - in my setup - on the backpack.

I tried this already once on an uncritical hill were I could have done it “the proper way”, in expectation of many barren hills to come (but so far, none yet :slightly_smiling_face:).

Does it work? yes
Is it comfortable? no
Does it look ridiculous? absolutely

Hope this helps.
73 de Martin / HB9GVW

2 Likes