Continuing the discussion from 3D prints for SOTA (Part 1) - #100 by EI3LH.
Previous discussions:
Continuing the discussion from 3D prints for SOTA (Part 1) - #100 by EI3LH.
Previous discussions:
Continuing the discussion from 3D prints for SOTA (Part 1):
You need hardened steel nozzles for filaments containing glass fibres, as they are very abrasive. For standard PLA and PETG, normal brass nozzles will work fine.
It’s a good idea to keep some spare nozzles on hand, as they can clog due to dirt or debris in or on the filament.
73 Heinz
PLA is generally thought to be the most forgiving material to use, but PETG isn’t really any more difficult.
Allegedly. I have been printing FT817 covers, and PETG was significantly less stiff, and could be broken with less than half the force of PLA.
PETG is nothing like PET.
ABS is harder to work with, but mostly stable in UV.
A lot of ABS parts I made simply lost strength and failed, with or without outdoor UV, within a few years. Filament ABS != Lego ABS
If you want seriously strong prints (engineering grade) you can get carbon-fiber filled PLA and PETG, but you will need an upgraded hotend (unless you go for a high-end machine which is already setup for using it).
I would dispute “seriously stronger” based on published data, and snapping a cover. Somewhat stronger would be more accurate. Allegedly less warpage, and the '817 covers printed beautifully in carbon PLA on a Bambu. Look fantastic too. Pity I need them painted bright-zinc silver not black.
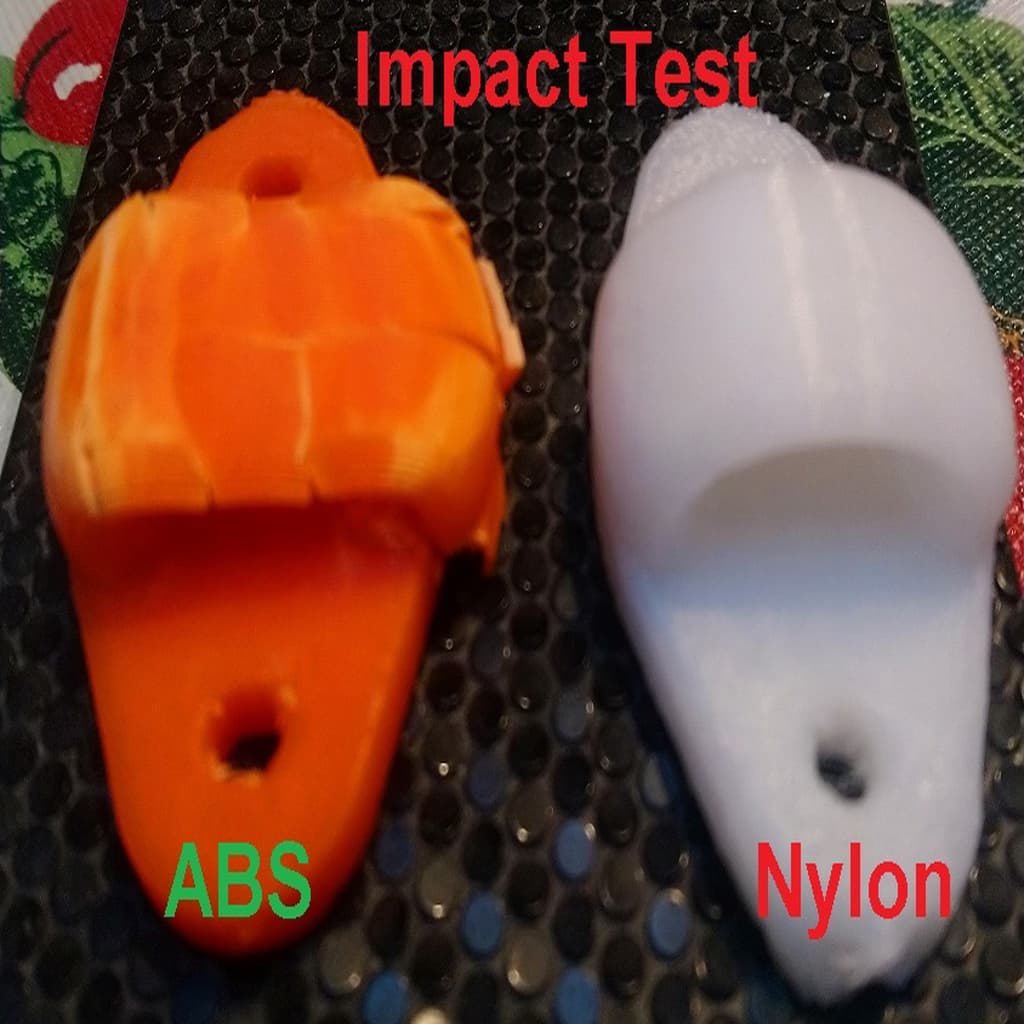
If you want “seriously stronger” try nylon. This is what happens when you bring a pick axe handle down hard onto a sample part.
Plain white PA6 nylon parts have been going strong outside for 6 years now. You do however need a continuous design that can be printed in nylon, as any gap will be bridged by strings. The Bambu has been unable to print ASA or PA6 so far, as the shrinkage pulls them off the bed, seems a heated enclosure will be needed,
I was trying to give a more simplified approach.
There are alot of factors which affect material performance, including initial design and stress concentration, in-fill pattern and density, wall thickness, material suitability for the purpose to name some.
You are right that PLA is more rigid than PETG, but this also results brittle failures once overload is reached. The flexibility of PETG makes it significantly more durable and impact resistant.
Printing with Nylon really requires an enclosure and a good quality heated bed and not something I’d recommend a newbie to try at first.
I find this site is generally informative about the different materials, as well as a good beginners resource in general: Ultimate 3D Printing Materials Guide | Simplify3D
Cheers,
Dave.
Gotcha. So using the hardened ones is really just overkill on PLA and PETG?
Learning so much from this thread and everyone’s real-world experience. Thanks all.
Brass is best for non-abrasive materials. For PLA and PETG, it’s better than steel because it transfers heat more efficiently. Only use steel nozzles when printing abrasive materials.
73 Heinz
Another one for the printing ToDo list. Shame it won’t work in 2025 though…
If you know, you know! ![]()
…and today I just ordered one. After much dithering between the A1 and P1S. Thanks @G7SAT this is your fault! ![]()
I had to discount the A1 Mini because when I checked a couple of *.stl files of things I wanted to print, I checked the sizes and they were too big for the build plate, even moved diagonally.
I just want to unbox it, plonk the printer on a cabinet top (ordered this from Amazon as my laser printer needs to sit underneath it: https://amzn.eu/d/5ClwVAU ), power on, click print. Done.
I went for the following:
I didn’t opt for the 1 year extended warranty as in the EU you get 2 years warranty no matter what (i had to explain this to Amazon France a while back once when a Wilfa Grinder I purchased packed up after a couple of goes.
They said I didnt buy an Amazon warranty at checkout so told me to jog on. This is a load of old cobblers so I went to Wilfa direct, which for Ireland is the UK HQ.
The Wilfa country manager contacted me directly and they said Amazon are talking codswallop (and they would tell them to stop this practice on Wilfa products). They sent me a replacement grinder and told me to keep my broken one, which I now have for spares if needed).
So Bambu can jog on as well.
Cost a pretty penny, and I need to buy more PETG filament (looking at Sunlu?). Not going to bother with PLA for now. Might try ABS in future though once my 3D Printing confidence builds up.
Thanks for all of the advice everyone. I would love to see more 3D prints for Ham Radio if anyone wants to share.
73!
I reserve PETG for anything that will remain outdoors. I use eSUN PLA+ for all my portable radio stuff, EFHW enclosures, pole accessories, ground spikes for poles etc. Never had a problem with PLA+ for this sort of use. Its supposed to somewhere between PETG and PLA.
Have you used Sunlu filament? Apparently it is the same supplier to Bambu or something along those lines?
I just went with PETG as all the bits I’ve looked at on Printables so far specify PETG. I will look in to Esun PLA+ though for sure, thanks for the recommendation.
Got a different table too. Forgot I had an Amazon voucher on my account so got this for €58 delivered. Loads of room for the P1S, AMS on top and going to get a Creality 2 roll drier to sit alongside it. I wonder can you feed from it to the P1S so I have 7 rolls to the P1S via the 4 in 1 adapter?
I think you made a wise purchase!
Unless you are doing detail work or reguarily doing large prints, I’d stick with the 0.4mm nozzle. I have a 0.2mm nozzle in a seperate hotend but rarely need to consider using it. 0.6 and 0.8mm nozzles speed up large prints, but again I’m happy to set it off and leave it overnight for anything big. You use the same amount of filament, but just takes longer!
I personally don’t bother with ABS anymore. PETG ticks all the same boxes for me, unless you want to do something like acetone welding of ABS parts (google it!). The only thing I think you have missed from your shopping list is the Smooth PEI plate, for which you will need some liquid glue.
The textured plate is great for small to medium prints, but if you have a large print with a large area in contact with the plate, the smooth plate and glue will prevent any corners or extremities from lifting or warping.
I use PLA for general printing as well, so I second Paul and encourage you not to dismiss PLA out of hand; every material has its’ uses!
I’ve pretty much used Bambu refills for filament, although you used to get discounts if you bought in bulk and offered lower prices for 6 months, but they’ve stopped that now I think. The RFID tags make material setting a doddle. I’m sure the P1S will print fine with 3rd party filaments, but you might need to do test prints using test models like this one, to get the settings (speeds, feeds and temperatures) just right. I’m just too lazy and prepared to pay the bambu premium ![]()
Thanks for letting us know which way you went! The next step is a 3D scanner and you can repair just about any plastic gizmo! ![]()
You can do that, or buy upto 3 more AMS’s for 16 potential materials or colours on tap of your choosing!
No, I have got some Sunlu TPU but not used it yet, another project on the list ![]()
My wallet disagrees! ![]() You’d be surprised that I was in the midst of saving up for a 3D printer, rummaged around the attic to sort some boxes and found two old video games I’ve not used in donks. Looked them up online and saw they were selling for a couple of hundred quid each! Flogged the pair off and that was my P1S funds sorted.
You’d be surprised that I was in the midst of saving up for a 3D printer, rummaged around the attic to sort some boxes and found two old video games I’ve not used in donks. Looked them up online and saw they were selling for a couple of hundred quid each! Flogged the pair off and that was my P1S funds sorted.
I should’ve invited Alistair Appleton round, he’d have shat himself! ![]()
Got it ordered. I ordered the smooth/textured plate as it was €25 if ordered at the same time. I would like to print most things using the smooth side. Not a fan of the textured look. It’s about as fashionable as sticking a can of L’Oréal mousse on your chevaux thinking ye will look mega but instead you end up looking like a bad knock off of yer wan from Roxette.
Noted! I might buy a sack of Sunlu PLA spools and see what occurs so. I was just following the advice from the makers info files on Printables e.g. lots of @K6ARK stuff says PETG on it, so I just did as I was told. ![]()
Not a hope! ![]()
Nice! I won’t go the extra AMS route for now. Are they stackable? Just curious. I will get the Creality 2 Roll drier though. Means I could maybe have 6 rolls of PETG (4 in AMS, 2 in Drier) and 1 roll of PLA chucked on to the side of the P1S and feed it all through the 4 in 1 adapter?
Sidenote. Only thing I was very hesitant about before parting with the cash was the whole Bambu firmware debacle. I’m a big fan of open source and right to repair, tinker, general fiddling and farting about with stuff and the whole thing has me a bit cautious that consumers are going to have their trousers pulled down by Bambu at some stage.
I read somewhere they backpedaled a bit after the backlash?
It’s been like that for a long time now. It’s never really bothered me. I doubt that Bambu are going to do anything along the lines of a bait and switch over the open/closed source issue.
Not that I am aware of ![]()
Once the filament has been dried, be that in a bespoke dryer like the Creality machine or in an oven, they can happily sit in the AMS for weeks and months, as long as the AMS has desiccant in it that is not worn out, which is unlikely if you don’t keep opening and closing the AMS. I change the desiccant every 6 months or so, based on my light to medium usage of the printer.
I put a small hygrometer in my AMS, and it usually sits at just less than 30% RH. If you put a new roll of filament in without drying it first, you are at the mercy of how dry manufacturers release it. I was in a rush to get a print done once and used some PLA out of the box and the hygrometer went up to 35% afte few days as the desiccant in the AMS (which isn’t a massive amount) did the hard work of drying the filament. I ended up having to change the desiccant soon thereafter (and it was long before that when Iast changed it).
Once you have dried the filament (which is always worth doing when you receive them new), store them in vacuum bags. I’ve used some from amazon with good success, but they are no longer available. These ones look similar.
Thanks for the tips on the vacuum bags. They look like Space Bags you’d use for clothes, bedding etc. I will make sure to get some!
I’ve been looking in to what to do about future filament purchases. Refills look like the most cost effective approach. I read back through this thread and it was mentioned too.
It looks like a straightforward process. I wonder is it as simple if you buy a refill of third party filament, assuming someone like Sunlu or Deeplee, for example, sells refills. I read somewhere that some third party spools need adapters and that the cardboard spools can be a bit awkward too.
Currently building up a list of things to print in advance of the P1S arriving. I got the Bambu app installed and am building up a collection of folders of stuff to print. Also nabbing a few things from Printables from @K6ARK and also that cool 2/70 Moxon from, I think it was, DL2MAN? Oh, and that dainty little RH770 load spreader too!
Whoever it was who suggested getting the P1S and AMS Combo, THANK YOU!
I haven’t stopped printing stuff since I got it earlier this week and still printing even right now:
Picked up a used Venus SW-3B earlier today from a very nice local chap who also kindly gave away a stack of great radio books (I’ll make sure to pass on the good will when I am finished with them too).
Found a case on Printables. Hark! It needs M2.5 10mm countersunk screws! 8 of them!
No problem. Printing 8 of them on the same plate too. ![]()
Printed a bunch of BNC dust caps for my QMX, KX2, Uniden Bearcat and now the Venus SW-3B too. Some PL259 covers too by @K6ARK which are great in PETG.
A KX2 swivel stand. A P1S poop chute. Various screws and fittings. Morse knobs amd more.
My favourite is this QMX cover which also acts as a stand and can hold KH1 logbook papers in a similar style to the KH1! Printed in white PETG.
Of course, the first thing I printed was a Benchy, which I gave to one of my mini headmelters who thinks it’s great (and now wants a collection of Benchy’s in multiple colours!).
The DL2MAN moxon is on the cards for a future print. Time to order a shipping container full of filaments!
Thanks SOTA Reflector folks for all the excellent insight and information in these 2 threads. ![]()
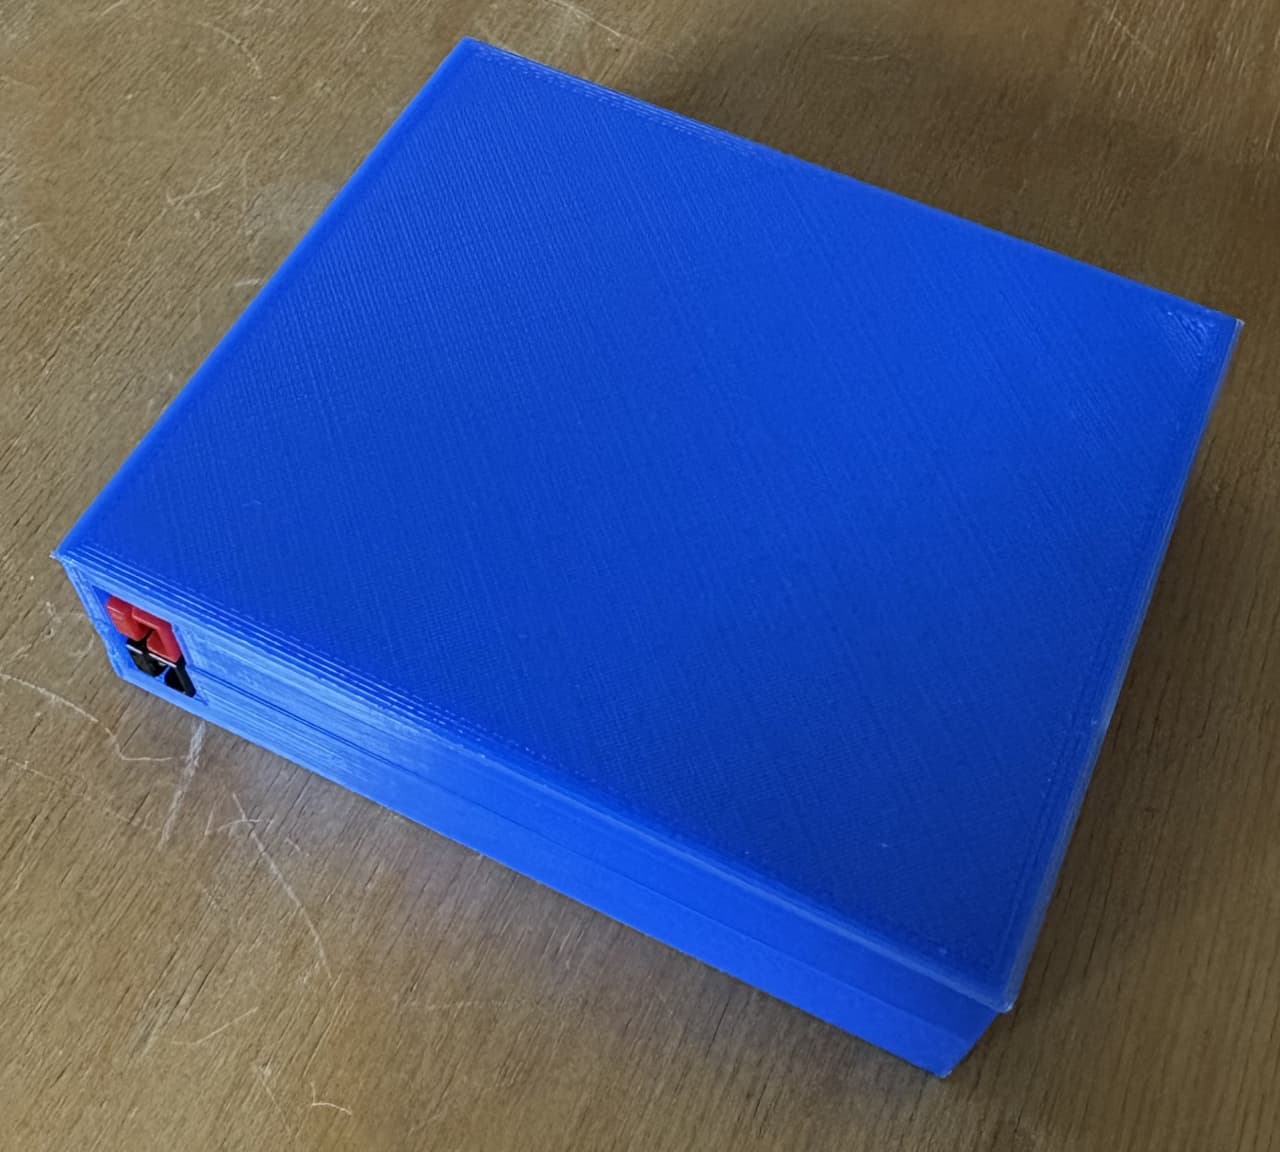
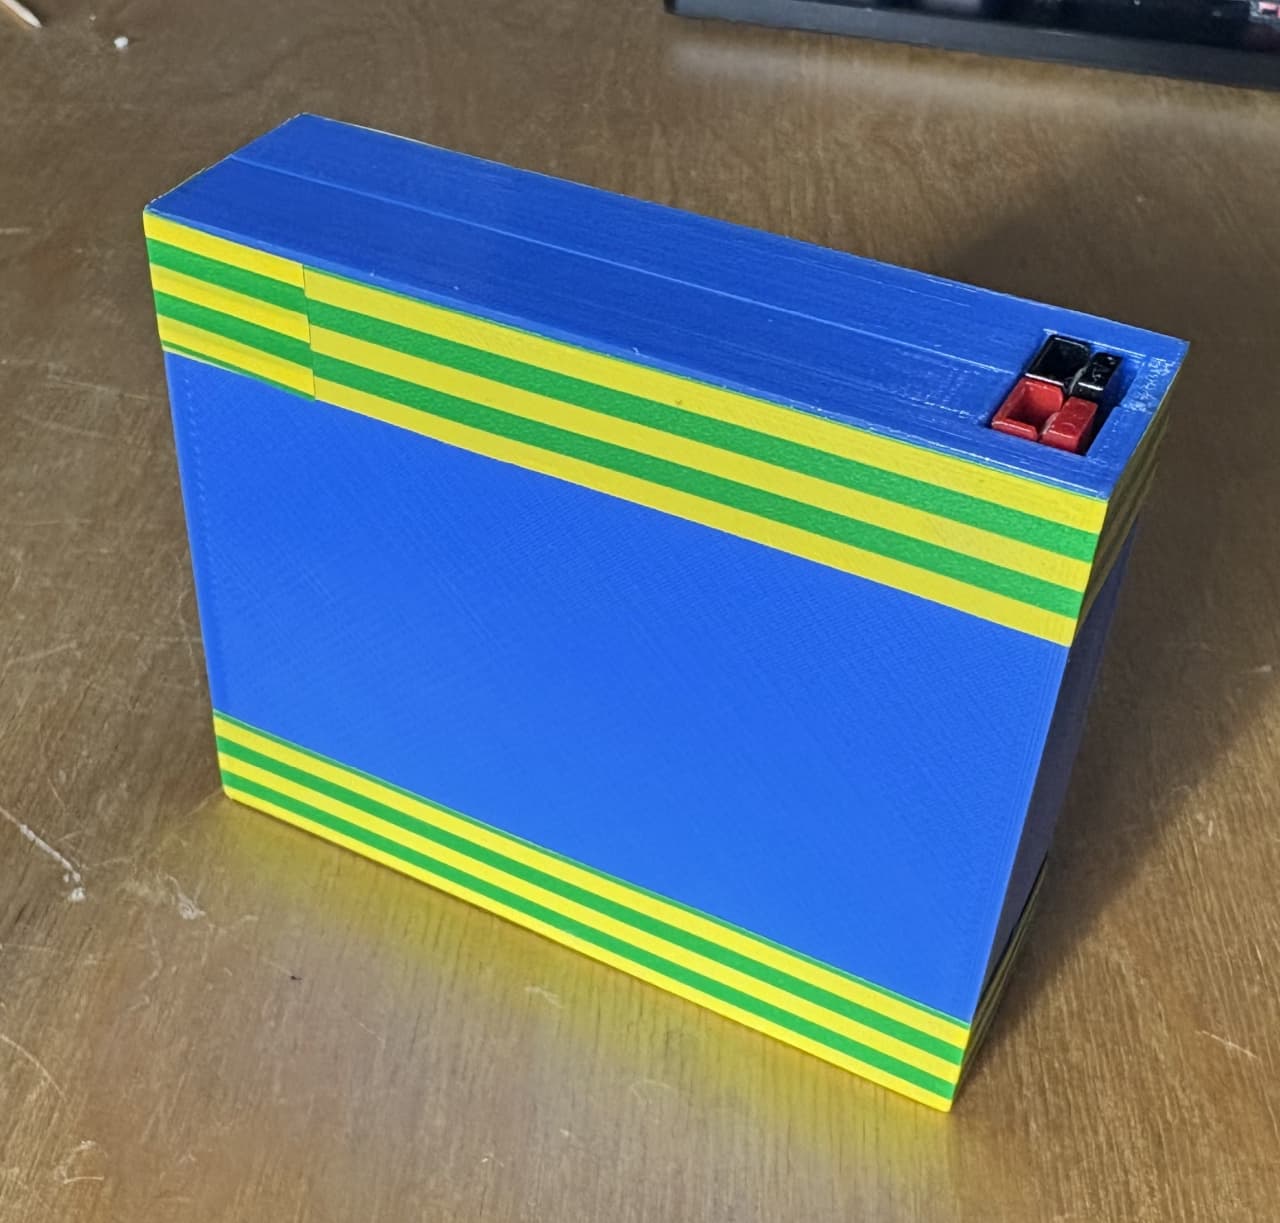
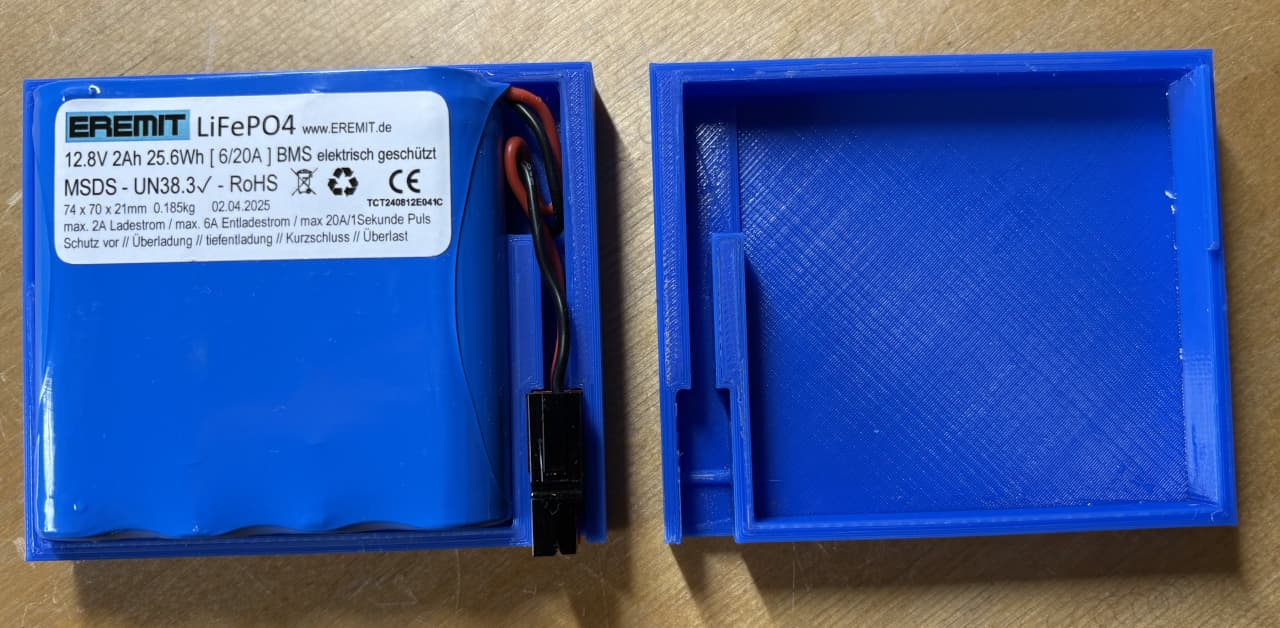
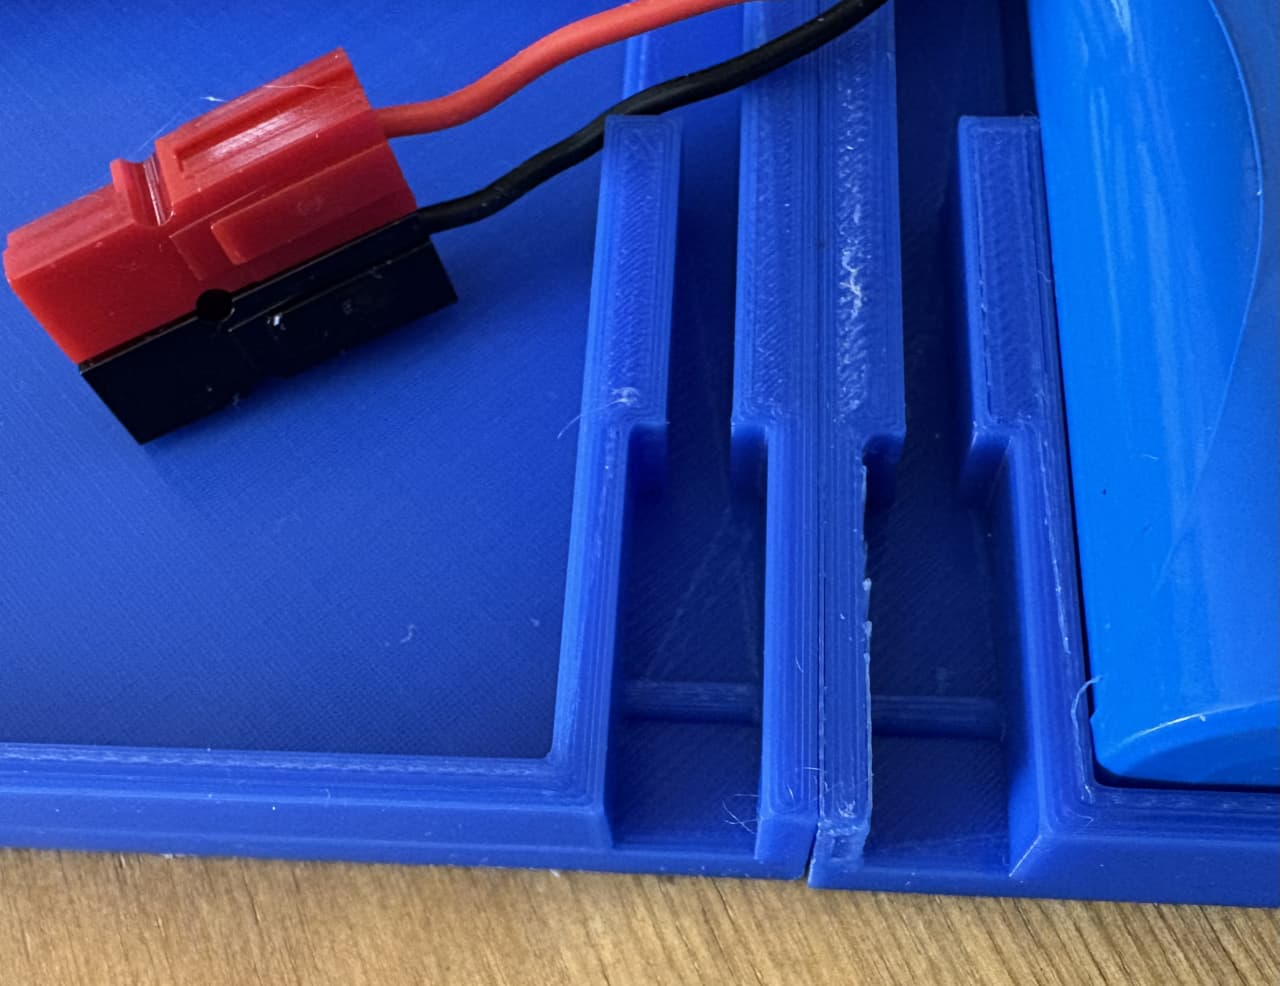
Eremit LiFePO4 Battery Case 2Ah 12.8V
The battery pack’s wire can gradually fail if it is used heavily.
This issue can be solved by using a simple case (here for the 2Ah 12.8V Eremit LiFePO4 battery pack) with a fixed Powerpole connector.
You can resize it to fit any battery size – see the SCAD file for details here: https://www.thingiverse.com/thing:7146164
You can close the case using glue or tape.
Nice! Did you print in PLA or PETG?
I’ve started working on a case for the VK3IL keys I’m building. I made this little test design up and it fits pretty much perfect (just slightly too long so it covers some of the sensor pads, which I wanted to leave exposed.
Changed my mind now since doing the test print. I’m trying to see can I make a little slider on the side so the whole key is concealed. When you want to use the key just slide it up a little to expose the touch pads. You could also then use the case/shell to stick foam or tape of some kind round the outside for a squishier grip.
One other modification I might try is to have the 3.5mm cable replaced with just a 3.5mm jack. Not sure yet. I’ve seen it done but it’s a bit fiddly and I’m not confident enough to try it yet. Here’s the very basic shell design. I need to work out next how to make a snap fit and also incorporate the slider rail and button.
I printed it using generic PLA on an old Anycubic Mega i3.